
You can’t tell me you haven’t heard of Donktober – I simply wouldn’t believe you. I’m certain everyone must be as donkey crazed as Erin of Missy Mac Creations and as such, we are clearly in need of a whole month to celebrate all things ridonkulous! Or maybe you can just use it as an excuse to work the word “ridonkulous” into your vocabulary a bit more.

So my offering for the Donktober party – a pattern and a tutorial! Oh and yes, it’s paper pieced. I know, seriously shocking isn’t it?! Can you believe that it is very difficult to find a paper pieced donkey block? Obviously that had to be remedied! So I present to you:
Senor Burro! Hee Haw!

He is fairly straight forward to put together, though there are a few little fiddly pieces around his ears. But you can do it! Look! Here’s a tutorial I prepared earlier! But be forewarned, there are a gazillion pictures to accompany it. Or if you’re already a paper piecing fantatic, feel free to skip the tute and just go download the pattern here.
Before you rush off to make your donkey block, must mention that you might like to pop by Rebecca Lynne's place for a giveaway! And then on Saturday, head back to see Missy Mac for the next installment of Donktober!
So! The donkey block! The pattern makes an 8” block – perfect for a cushion or a wallhanging or a bag or anything that could use tizzying up with a donkey! So let’s get to it! And might I add a big thank you to Lucy from Charm About You for testing the pattern for me too!
Step 1: Assemble the troops!
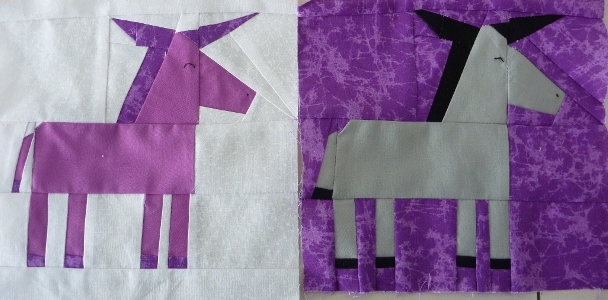
Okay just get your stuff ready to sew. You need a copy of the pattern (download it here), and chosen fabrics. You can see I used scrappy fabrics for the donkey. I also have a previous donkey block there for reference – not having one you prepared earlier, you might like to print out a picture or refer to this tutorial as you sew. It helps to know which fabrics to place where.


Cut the pattern up into pieces. Here I’ve laid it out so you get an idea of how the donkey is assembled.
Step 2: Get the fabrics and get ready to go!

Stop! Before you do anything further – make sure you reduce the stitch length on your sewing machine! This is an essential step to make sure the paper tears away easily!
Some paper piecers like to cut their fabric to size before they start sewing. I don’t. I use large chunks of fabric to make sure that I cover both the visible area and the seam allowance (second line outside the shape you’re working on). But to give you an idea of what you need when you start, I did actually cut some rough pieces to show you.

Paper piecing is all about sewing by number. So in this pattern, we start with A1 (leg) and A2 (hoof). Flip your paper over and lay the fabric over the A1 section. You might need to hold your piece of paper up to the light so that you can see the lines. You want roughly a minimum ¼” of fabric over each line.
Then lay the A2 (hoof) fabric over the top, making sure you have that line between A1 and A2 covered. The idea is that when you sew on the line, you can flip the black fabric back (up in this picture) and it’ll cover the A2 section – pics further down.


Holding the paper and fabrics in place carefully (or pin/glue if you’d rather), flip the paper over, ready to sew. We sew on the printed side, fabric on the unprinted side.
Back stitch at the beginning and end of the line you’re sewing on, but try not to go too far into the other sections if you can help it. This bit of reinforcement helps your seams stay put when you tear the paper off. Sew on the line between A1 and A2. Now it’ll look like this:


Now finger press the hoof piece down. You can iron it if you like. I’m lazy. I just finger press and iron at the end.

Pause to celebrate that you have done your first paper pieced seam! Yay! Right, back to work.

Get your next piece of fabric (A3 which is background) and lay it over the seam on the side of donkey’s leg.
Sew!


Repeat with A4 (more background fabric). You have now finished sewing Section A. Well done!

Step 3: Sew, finger press, sew, finger press, sew, trim for good measure.
Now you just need to do this all again for the next sections! Most are pretty straight forward with straight seams. Easy peasy. Just take your time, and remember, first piece of fabric goes face up, all others face down. Sew on the printed side of the paper. Have your seam ripper handy, just in case. ;)
There are a couple of angled pieces – but they aren’t difficult. Honest. So let’s look at the tail in Section F. You can see that F3 needs to go on at an angle.

But it’s a cinch. Just lay your fabric in line with the seam. You may need to flip the fabric back a few times so you can check you have covered the line, but better safe than sorry (or better to check than unpick!).


Now there is that little bit of grey fabric hanging out behind the seam we’ve just sewn. It’ll make things bulky and unwieldly at the end. So go ahead and trim a roughly ¼” seam behind the seam.

Keep on piecing! Then suddenly you’ll be at this stage! It’s like a donkey painted by Picasso! Don’t worry, it’ll start making more sense soon.

Step 4: IRON.
 Important to stop here and iron all your pieces. It makes them look so much tidier. No photo of me ironing – because really how boring would that be. But here are some tidy paper pieced sections to admire.
Step 5: Get that ass into shape!
No, not you. The donkey. Let’s go trim up those sections. Lay them face down on your cutting board. Use your trusty rotary cutter (scissors will work in a pinch) and cut ON the seam allowance (the furthest outside line). Don’t cut on the dark line that edges the block or you’ll have no leeway when you join the sections together.

Now your blocks will be looking a lot tidier, and you’ll also have plenty of messy scraps.

Step 6: Putting it altogether.
This is the fun part! You can start to see the donkey take shape now!

You will need to sew the pieces together in a certain order, then iron before sewing some more.
Start with: A+B+C+D
Here’s A and B ready to go.

I tear the paper off at this stage, but some paper piecers sew with the paper on. Personal choice. If you decide to tear, be gentle so you don’t tug too much at the seams.

Once the paper is off, line up your sections carefully and then sew them together. Note: Use regular stitch length now. That way if you make a mistake it’s not a real pain in the ass (ah the ass jokes just keep on giving with this project) to unpick the seams.


Sew the rest of the leg sections together so you have this:

Now you need to sew I+J and H+G. Then go iron all the pieces. It’ll all be looking like this. Except flatter. Because I took this photo before I ironed.
Sew K+ IJ+ HG and iron that. Now all the vertical seams are done and we are ready to sew the horizontal seams! Woo! Nearly there!
I sewed the body onto the legs first. Now there are some seams you want to line up here – namely the front and back leg need to line up with the outside seams of the body. So I suggest pinning it to make sure you get nice neat seams. I sew over my pins (totally living on the wild side) as I find it keeps my pieces exactly how I want them.

Go ahead and sew all the pieces together now. Your result should look like this (but hopefully not quite as washed out!)

Step 7: Embroider and trim!
Nothing like a donkey with no eyes. So grab that embroidery thread and give it a little eye and nostril. It’s the details that count.

Now trim your block up! Yay! You’ll now have a nice tidy 8” donkey block. Well done! Not only have you done some fab paper piecing - you’ve made a super awesome donkey!

Hee Haw! Thanks for stopping by! Hope you enjoy the rest of Donktober!

I haven't heard of Donktober but I love it! Great block!
ReplyDeleteGreat job! Love it!
ReplyDeleteOh, Kristy, you are a doll. Loving your donkey. Thanks so much for joining in the Donktober madness. xo
ReplyDeleteHow fun!!! Thanks for sharing your donkey block and great tutorial!!!
ReplyDeleteThis is too cute!!
ReplyDeleteI WILL BE MAKING THIS!!!! He is just the cutest little donkey I have ever seen!! I love it!! Thanks for sharing!!!
ReplyDeleteGreat tutorial but no donkey lovers around :-)
ReplyDeleteOh, you're so right that the donkey paper piecing pattern shortage had to be remedied! Yours is wonderful!!!!
ReplyDeleteFabulous! I had a lot of fun testing the pattern and now need to think about what to make my donkey into! :)
ReplyDelete